One of my earliest experiences of computer programming was when my school acquired a computer lab, and we did some Turtle Graphics programming, probably in Logo. The school even had a robotic turtle which was used to draw lines on paper on the floor. I think one project we did was to draw the letters of the alphabet which made up the name of the school, or some other message. In any case I remember making the turtle go round drawing lines.
Earlier this year I read Mindstorms by Seymour Papert, which describes how computers can be used by children to learn about Mathematics and programming, and how the Turtle Graphics system is a better system for exploratory learning than the Math is conventionally taught. One of the reasons for this is that the child is able to identify with the turtle, and solve problems by walking out the path of the turtle, and performing the instructions of the program. There is a fascinating description of how younger children were actually better at figuring out how to get the turtle to draw a circle by going forward a bit and turning a bit repeatedly, than were older children who had already learned more objective facts about circles, such as that they have a radius and a center. Even older children who had learned the algebraic formula for a circle were actually incapable of solving the problem.
Recently I discovered the Holy Grail of the field, the definitive Turtle Graphics by Andrea di Sessa and Harold Abelson, who also co-wrote the Structure and Interpretation of Computer Programming. I’ve only just read the first chapter, but I was inspired to try out implementing a Turtle Graphics environment in Javascript, using Canvas as a rendering surface.
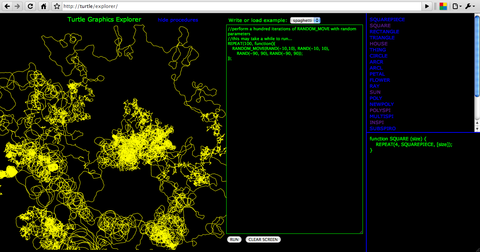
I started out typing my functions into the Javascript Console of Chrome, but I had a vision of a web-based interactive Turtle Graphics environment, where users could run their own code and see the results instantly. So this weekend I hacked together the Turtle Graphics Explorer. Its not going to work in any released version of IE (I’ll add Chrome Frame soon), but that will change when IE9 ships. A new version of Chrome, Safari, Firefox, or Opera should be fine, though I admit I’ve not tested thoroughly. Hopefully it is easy to understand.. load an example, or look at the procedures to see how they work. There is only very rudimentary error detection, so if it does not seem to be working, you may need to re-load a working example, hit ‘clear screen’, or just refresh the browser.
Here is a screenshoot of the application.. click on it to open it up, and start exploring ;)
All the code is available at the GitHub project.